All is possible

Month: July 2013

Rewrap files, how best to handle them quickly.

How to manage a rewrap under MacOsX using free software

Sometimes it takes very little to make your life easier, but it takes even less to complicate it… When working with several cameras and dslr’s that use the AVCHD structure you can have some problems managing them from editing and post programs, because they use the MTS format as the container, and a series of folders and subfolders as the structure. It all originated from the idea of recording this way, because it is also the format used to create a bluray, so copying the complete structure inside a bluray disc will then be read by a regular player. All well and good if we want to make a bluray right away, but if we want to edit them … both under windows and under mac we may encounter difficulties.

Under MacOs X the AVCHD structures are seen as a more … “rigid” structure so it is important to know how to handle them.

The avchd is an H264 file encompassed in a structure of folders and subfolders that are useful and parallel to those of the bluray to simplify the transition from the camera to the bluray disc with a simple burner, but when we want to edit the files we are faced with files with .MTS extensions, which the finder does not handle comfortably (actually neither does the windows explorer).

The easiest, fastest and most convenient operation to handle them is the process called ReWrap, that is, we change the container, from Mts to mov. ReWrap does NOT recompress the data, so there is NO alteration or loss of information. But by changing the container to mov magically all programs will open the files, the finder will preview them for you, and so on…

Also the operation is little slower than copying the files.

There are several applications that perform rewrap, and in particular the most powerful one is Ffmpeg, a free utility that performs hundreds of tasks, with speed, quality, etc. too bad it is a line command program, that is, it is run from the command console as was done 40 years ago, fortunately several developers have created graphical interfaces to perform this task.

I point you to two software programs that use ffmpeg under mac, which allow you to rewrap. Below you will find directions for using the first one free, and the link for the second one which is paid, although a very trivial amount.

What are the steps to take?

Few and simple :

Step 1 : being able to read the structure files as a file and not as a folder

To copy the AVCHD stream files we need to see its folder, so we open the related tab :

avchd_02

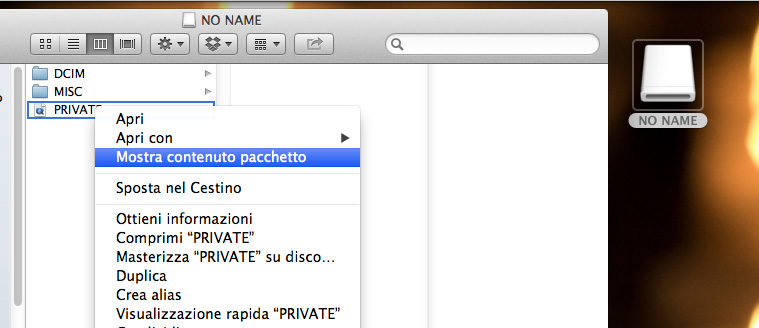
Show package serves to see the contents

The Private folder looks like a file, but it really only takes a little, with a right click we choose :

SHOW PACKAGE CONTENTS

So we can navigate the internal folders, we will have to repeat this operation for several folders to navigate the subfolders.

We need to go inside the structure of the AVCHD

Basically we have to get inside :

– PRIVATE – AVCHD – STREAM
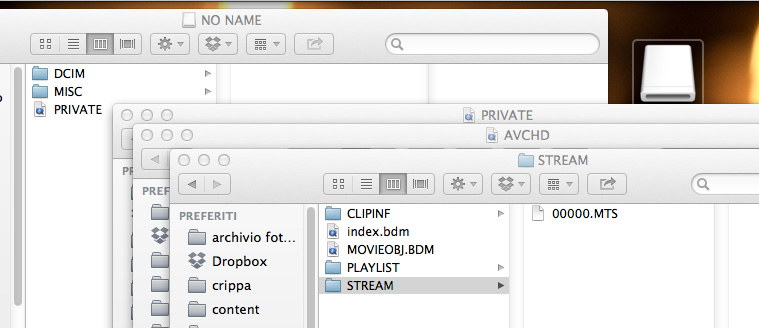
avchd_05

The actual path

In this very last folder we find the Video files.

Let’s copy them to the ‘Hard disk to be faster in the various procedures.

It is also possible not to copy them directly to the disk, but it would be slower operation


Stage 2 Media Converter

Let’s go to the site of Media converter, a Free utility that acts as a Front END to free ffmpeg encoder.
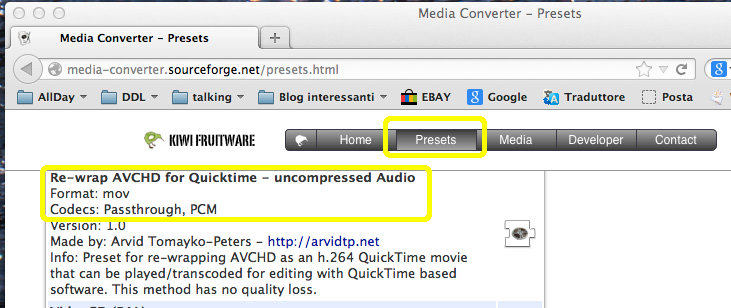
avchd_07

which preset to use

From the Presets section, download the preset for AVCHD rewrap, because it is not standard in the program.

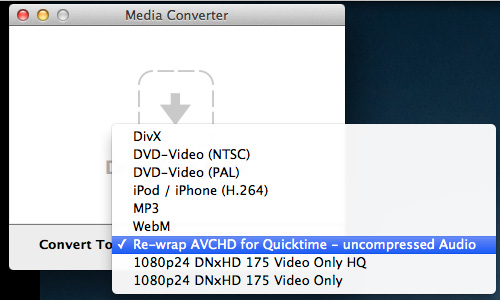
There are two, one that doesn’t consider audio, the other that does.

The program requires no installation

just copy it to the application folder and run it.

avchd_08 how to add presets

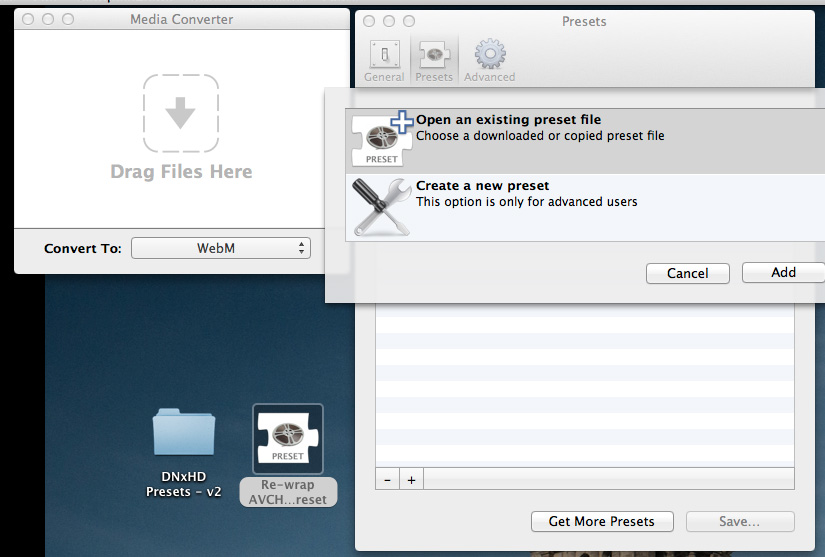
To install presets just go to preference, and click on the preset item.

To add the preset just click on the symbol in the lower left corner

The little window you see below will open, and click on Open an existing preset file, and select the downloaded file.

Once you have loaded the presets of your choice, you can close the preference panel. And you are ready to perform the ReWrap.


Step 3 CONVERSION

avchd_09

easy conversion

We choose from the drop-down menu the format we want as the final output for our files, in this case we choose Re-Wrap.

We drag the video files we want to handle directly onto the program window.

As soon as you release them the program asks where to save the resulting files, you specify a path, and the program starts working.


avchd_13


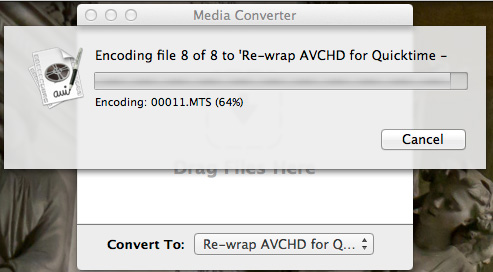
And then you only need to wait a few seconds or minutes depending on the number and duration of the movies.

The result will be .MOV files that can be opened and managed in various programs.

Side note, if for some reason it does not make you install the preset for all users, the reason is very simple, you do not have permission to update the internal folders as a user, so you will have to download the free utility BatChMode, which allows you to reset the permissions of the preset folder of the program.

An alternative is to manually copy into the user/user name/library/application support/media converter/Preset folder the preset files that you can find online.

Another very interesting application for rewrapping under MacOsx is the Emmgunn suite, a series of utilities that allow you to either rewrap a file to mp4/mkv/avi or compress it to those formats if the source codec is not supported in the rewrap. The free version has the limitation of doing one conversion at a time, but enough to appreciate the quality of interface etc. Also based on Ffmpeg, it is an encoder suite that costs less than a pizza and is worth it for speed and quality.

Update July 21, 2018: thanks to the gradual development of software vendor’s stinginess (I am being caustic today and I have reason to be) most video software no longer reads/decodes audio in AC3 codec because the Royalties with Dolby have expired and have not been renewed, Windows with the 1851 upgrade has removed support for that codec from the system so you may find that your files are without audio (most prosumer cameras and cameras use dolby AC3 for audio encoding). The preset that rewraps the video converts the audio to uncompressed and then allows you to then read it even from applications without AC3 codecs


FullHD is not really full, in fact–often much less.

fig_01After reading my previous article, on the aspect ratio and pixel measurements of home and cinema movies I imagine great enthusiasm for everyone, thinking that nothing is enough to be able to bring their movies to the big screen. Let’s say that was only a half-truth, because we talked about pixels, and the information with which movies are made for the big screen and for the (relatively) small screen. All true, as far as the final product is concerned, but often the numbers do not correspond to the information captured by the sensors or massaged in the various steps between DI editing and postproduction.

Let’s define what fullHD is on a theoretical level

FullHD is a combination of pixels forming a video that is 1920 pixels wide x 1080 pixels long.

The problem arises from the fact that one should not only consider the recorded file, but it is crucial to check how this information is created and sampled, because the majority of camera sensors (especially in consumer and prosumer, but also in many pro) do not even have enough pixels to cover that number of pixels and are achieved by “technical tricks” such as pixel shifting, oversampling etc etc

So often the cameras have a different (often lower) number of pixels and those numbers are artificially achieved.
So we are talking about images that are less defined than what they really should depict that number of dots.

An ideal camera has one or three sensors in FULLHD format, i.e., measuring 1920 x 1080, whereas when using larger sensors (HDSLR) the technique of scaling from a larger number of pixels is essential in order not to introduce defects and/or loss of definition.

The argument is very simple, if we have too much information, some of it should be discarded, however, if the technique is wrong, the drop in quality is great and thus defects are created.

In order to optimize the video recording of the information collected by the sensors, different manufacturers use different techniques, with several disadvantages:
– only parts of the colorimetry are captured (4:2:2 or 4:2:0 sampling)
– you compress the information (introducing artifacts)
– you lose some of the sharpness in an attempt to reduce the file size

on the other hand as advantages :
– the weight changes, files go from 11.2 gigs per minute (uncompressed file) to 350 mb per minute.
– the buffers and the media on which to save the footage are fewer in demand and therefore cheaper to make
– the machines are more agile and compact, thus allowing the use of cameras even in very constrained and risky situations.
– one has theoretically “democratized” the production of more “cinematic” quality footage, for those with the know-how on how to use them.

The camera works in FULLHD, but how?

MINOLTA DIGITAL CAMERANow HDSLRs are so fashionable, because they are said to have the “cinema effect” inside (we will talk about this illusion in the future), we shoot in FULLHD, theoretically, that is, the file we save has that format, but depending on the machines the sensor captures images differently, more or less well, more or less detailed and/or sharp.

Being a practical person I will not mention one or the other brand, but the technologies used, how they work and what the results are according to our purpose: to have better images.

HDSLRs are used because they have larger sensors than classic cameras, so they offer brighter images for the same lens, more compressible DOF to detach subjects from the background, lower contrast that helps postproduction.

The advantage of the large sensor is a flaw for other reasons, because the CMOS sensor suffers from a flaw called rolling shutter, so the larger the sensor, the more pronounced the flaw in moving shots, especially on circular motions.


In this video you can see how rolling shutter alters rotating elements.


in this video you can see the comparison of linear rolling shutter between two different sensors (aps-c and FullFrame).
Notice how for the same motion the larger the sensor (full frame) the more the buildings tilt and look like they are made of moving jelly.

The rolling shutter is partially correctable in post (the linear one) while for the circular one you can hope for miracles…

When it’s too much…

Another nontrivial problem of using photo sensors is scaling… because we don’t have the pixels of fullHD, we have a lot more… fullHD is about 2 mpixels, on HDSLRs when it goes wrong it’s 16, which is not always an advantage…

HDSLRs mainly use two image scaling techniques : line skipping and pixel binning.

Line Skipping

Line sk ipping is the oldest technique, which should be considered obsolete today, but when it was born 6 years ago it was manageable.
How does it work?

line_skipping

Simple, we have 4000 lines? we only need 1080? okay then we take a line, discard a certain number, then take another line, and so on until the end of the sensor. Of course taking into account the structure of the Bayer sensor, so as you can see in the side image the information captured compared to the original sensor is definitely few and far between.. which brings several problems.


Advantages
:
– fast
– simple to perform
– does not require processor power and quick to handle in saving

Disadvantages
:
– taking only part of the information you lose definition
– you have artifacts such as aliasing (jaggies on images)
– moires (caused by causal sampling of lines)
– flickering of fine lines (because they are seen in the captured lines in some frames and not in others)


Pixel Binning

bloom

The second technique is Pixel binning, it is more effective because it uses all the pixels in the sensor, discards nothing, and to create the movies it downsamples all the information.

In this way it avoids ALL line skipping problems, without introducing other problems.

This technique is a recent introduction in HDSLRs and applied only by some manufacturers because it requires a much more powerful in-camera processor, larger buffers to handle all the information flow, and subsequent sampling for FullHD format.


Color sampling, what is it and why does it concern us?

Professional machines sample color information with sampling defined as 4:4:4, meaning that for each group of pixels all color and brightness information is captured and recorded. Prosumer machines work with lower color sampling, from 4:2:2 to 4:2:0. The lower color sampling, is often not noticeable on the original footage, but if shot within the limits of recordable quality, or if it is heavily post-produced it can show its limitations and/or a greater limitation in its workability.

Without boring you with too many technical concepts, the three digits refer the first to the luminance of the footage, so any pixel brightness information is sampled and captured, the second two digits refer to the sampling of blue and red. In the image below you see a graphical representation of that sampling.850px-Chroma_subsampling_ratios.svgso we have a more stable and detailed carrier in the luminance, while if we have to manipulate the color on the blue and red we have less information, which can turn into artifacts or defects on the final footage.
Beware of the verb used, the conditional, because it is not necessarily the case that the footage, if handled carefully, and correctly, will generate defects or problems. Certainly a movie originally sampled at 4:2:0 will provide a lower level of manipulability than a 4:4:4 movie. But this is not a limitation, because in big screen movies, contributions and materials from different sources are used, often commercials before movies are shot in fullhd, in many different formats, and the differences are not always noticeable.

Concluding

So we have instruments that record 1920 x 1080 footage, but we don’t have confirmation that they have really captured that grid of information, in fact in most cases we have certainty that they have captured only a fraction of what we need, both in terms of definition and color.
This is why I wrote that the FullHD format is yes very close mathematically to the film format, but these are not necessarily enough characteristics to have a picture ready for the big screen.
Without wrapping one’s head around it and discarding all tools a priori, let’s remember how there are many films shot with more humble means such as 16 mm film, or more recent films shot in dvcam (28 days later, by danny boyle). And in so many blockbusters there are many sequences shot with HDSLR, but I challenge you to envy them amidst the other cuts. So you can shoot and by carefully working your footage bring it to the big screen, but from here to say that they are the same thing as using professional cameras …
Good light to everyone!


Aspect ratios and formats for cine – video maniac graphics..

After reading so much misinformation on forums and books, I felt like writing something to clarify some concepts that should be commonplace for those who work in video, but often are not.

The aspect ratio

The aspect ratio is the ratio of height to width of images, which in film and TV have changed over time both to provide more exciting images and in the race of competition between film and TV.
Now I am not going to give you the history of aspect ratio, partly because there is this wonderful documentary on vimeo that shows all the evolutions of the various film and TV formats.

The Changing Shape of Cinema: The History of Aspect Ratio from FilmmakerIQ.com on Vimeo.

At widescreen.org you will find all the variations that have arisen over the years of film formats.

When we make a movie there are rules, so we can’t invent anything, because if we go outside the rules we can’t distribute the movies.
Blurays have standards both in terms of frames per second and in terms of the size of the movie, which will always and still be with a ratio called 16:9, so with an aspect ratio of 1.78.

If you want to produce a bluray with a different format you will put the classic black bands on the top and bottom, because the standard is defined and therefore you cannot put in formats other than the standard: 1920 x 1080 at 24 progressive frames, that is, like cinema.
There are variations with the 25 interlaced and others, but if you want to make a product for cinema and TV, you stay in the 24 progressive.

So if a film has a different aspect ratio, it will contain black bands in the bluray to achieve the correct video file size of 1920 x 1080.

In digital cinema, the DCP (Digital Cinema Package) format has different aspect ratios ranging from the classic 1.85 to the cinema scope 2.39 , and have different pixel height-width ratios.

Format 1.85 : 1998×1080 pixels or double their size, for 4K projection
Format 2.39 : 2048× 858 pixels or double them, for 4K projection

In cinema there is no concept of black bands, at most there are projector masks. In film shooting, a good DOP has several indications in the viewfinder that tell it where the frame will be cut for film projection, for television viewing (4:3 and 16:9), and so on.


Pan and Scan

In the past depending on the viewing and projection formats they would put on the film pizza the indication of the aspect ratio, the eventual anamorphic lens to be mounted, because in the projection stage, the projectionist would put a stencil in front of the projector to have the correct aspect ratio.
supra35This is because in the shot, microphones could come into the field, pieces of the special effects could be seen, and so on–so with the stencil, such elements were hidden. In this image from the Muppet movie, you could see the edges of the stencil, the animators’ hands, and more…

In the early days of television and home video pouring there were big problems, from the infamous pan and scan, which basically cut the images sideways so that the black bands would not show, butchering the films, or they would film completely but not put masking, so in some films you could see flaws and problems not present in the film version, for example in Total Recall with Arnold Schwarzenegger, in the finale you could see the supports holding up the mars backgrounds, or in Don’t Look at Me I Can’t Hear You, in a scene where a car runs uncontrolled down a hill you can see the hook and part of the camera car that was used to move the car under the control of the stuntmen…

widescreen_gb2On the Theraffon.net website we find a nice example image of how the GhostbustersII film was repeatedly raped by reframing for homevideo and laserdisk and DVD versions.

Starting from the cinematic original to the different variants of cutting and manipulation of the original framing.

We see how key characters (two of the main characters) are lost depending on the formats.

This problem is unfortunately still present in the various adaptation systems of digital televisions that in the ill purpose of eliminating black bands, distort, cut and manipulate the original images betraying the original spirit of the framing created in the film.

Digital today, easy solution?

Today with digital at the cinema IN THEORY it is easier, but you see many cinemas where they set the wrong projection format believing that all films are in cinemascope by cutting off the images above and below (in dialogues heads remain cut off, in advertisements many writings are off-screen).
In short, today we are fortunate enough to be able to repeat in a multiplex with a digital projector, the vintage experience we had in theaters 4 category 50 years ago…

grindhouse


How to set the framing for different aspect ratios?

If we want to make a movie that will then have to be adapted to the 1.85 wide-screen format or the 2.39 cinema scope, the simplest thing is to take an acetate panel and draw lines on it to highlight the visual limitations from those formats, so that by placing the acetate panel over the camera’s lcd viewer, or on the control monitor, we can get an idea of how to build the framing for that format.
It is very important to decide at the shooting stage on this division, because the balance and quality of the framing is decided at that moment, afterwards we will not be able to adjust the framing except slightly and thus we will lose professionalism instead of increasing the cinema effect.


Two dispassionate suggestions for the shooting phase :

– always keep 5-10% wider than what you consider the final shot, any stabilization work and slight re-framing (cropping of the frame) could create imbalance if you have not left air around your shot.
– however, consider the framing as total, even if you then remove something above and below, because if you were forced to move the image up or down to adjust the framing, any spurious elements in the frame that you consider cropped will prevent this movement, or force you to delete it.

I enclose this pair of PNGs in which I have put the images of the two most commonly used film formats in comparison with the different video formats, just to understand how at the pixel count level there are no particular differences, so a good-very good fullHD can be used to make a more than decent film DCP, especially considering that for 50 years many films were shot in 16mm and blown up to 35mm, or used 35 very stretched.

ratio1.85 ratio2


In the next article we will talk about pixels in shooting, in compression, why not all FullHD is the same, and most FullHD movies are “fake” meaning that even though they have that number of pixels, they do not contain an equal amount of information to what you would expect, so FullHD is not always Full… in fact…


Powered by WordPress & Theme by Anders Norén

error: Content is protected !!